


Clutch / Transmission Parts

Advantages of PHC Valeo Clutch Release Bearing
Developed via internationally patented technology
Together with the cover and disc, the clutch release bearing is the major component of the clutch system. When the engine starts off a gear is shifted, it pushes the diaphragm of the clutch cover, and the pedal power is delivered through the clutch master cylinder and the clutch release cylinder, so it cuts engine power away from the transmission.
Employing the world's top-tier self centering system technology, PHC Valeo release bearing automatically adjusts the friction generated by intermittent clutch power, thus preventing excessive abrasion and prolonging life.
Made of advanced engineering plastic resin
It's made of advanced engineering plastic resin, so it's very compact, and light in weight, and effectively absorbs the vibration in any part of the car.
Certificate
IATF 16949 / ISO 14001/ OHSAS 18001
Clutch Release Bearing Assembly
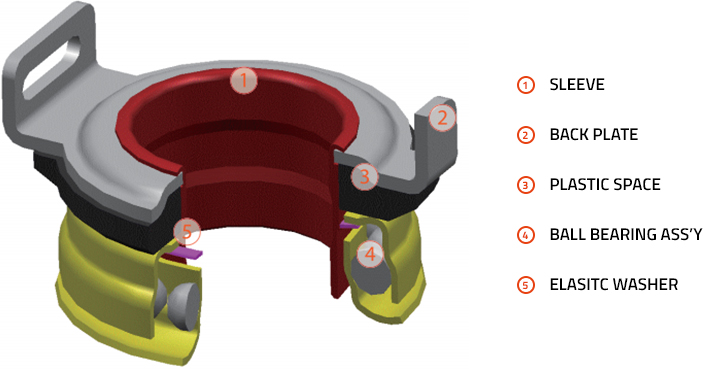
Clutch Release Bearing Assembly Type
Classification by a direction of a load of clutch cover
- Push type
- Pull type
Classification by sleeve material
- Steel sleeve
- Plastic sleeve
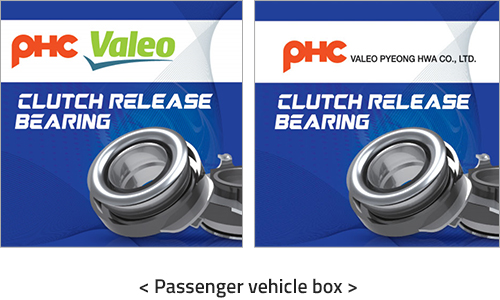
Marking & Details on Clutch Release Bearing
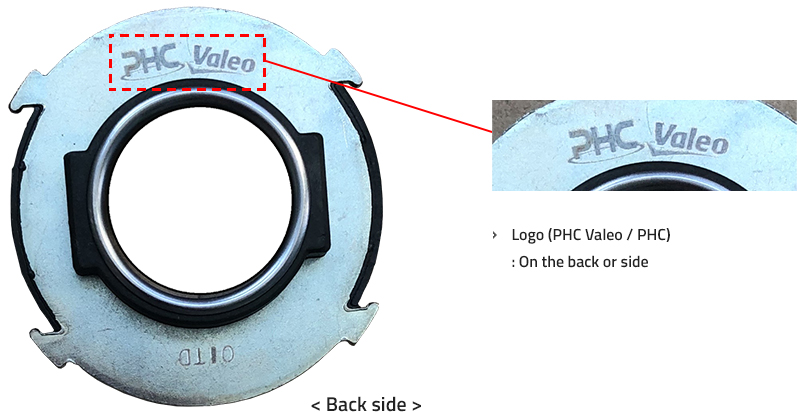
Box Details
Brand logos are flexible depending on the market.

Label Details

Troubleshooting
-
Damaged release bearing [gear shift]
![Damaged release bearing [gear shift]](../../../eng/_include/image/content/img-bearing-list01.jpg)
Causes
- Poorly arranged clutch cover
- Wear of a release bearing seal
Maintenance & caution
- Replace a release bearing
-
Excessive pedal pressure [gear shift]
![Excessive pedal pressure [gear shift]](../../../eng/_include/image/content/img-bearing-list02.jpg)
Causes
- Poorly adjusted release bearing guide tube
- Wear and deformation of a bearing guide tube
Maintenance & caution
- Clean the contact of a bearing tube with high-temperature grease
- Replace a guide tube
-
Irregular wear of the contact of a clutch fork [other]
![Irregular wear of the contact of a clutch fork [other]](../../../eng/_include/image/content/img-bearing-list03.jpg)
Causes
- Wear and deformation of the counterpart
- clutch fork arrangement Poor
- Release bearing being stuck
Maintenance & caution
- Replace a clutch fork
- Replace a release bearing guide tube
-
Irregular wear of a clutch fork [gear shift]
![Irregular wear of a clutch fork [gear shift]](../../../eng/_include/image/content/img-bearing-list04.jpg)
Causes
- Irregular wear of the pivot of a clutch fork
- One-sided wear of a clutch fork
Maintenance & caution
- Replace a clutch fork
Clutch Installation Guide
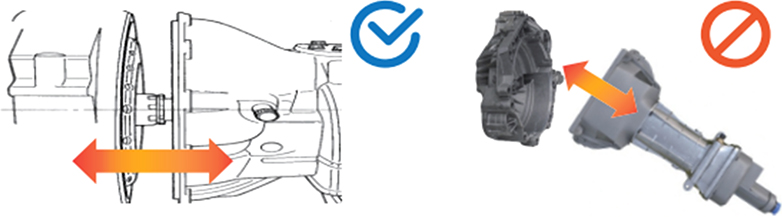
Clutch Removal
- Mark drive shafts to match up on reassembly.
- Fully support transmission making sure that it’s securely fastened to transmission stand. Do not allow gearbox to hang on the input shaft.
- Remove gearbox directly backward but not diagonally.
For Best Results
- Install new release bearing and pilot bearing/bushing whenever installing a new clutch
- Replace clutches as KIT
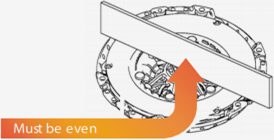
- Surface of the pressure plate & flywheel should be even or flat.
Inspection & Checkpoint
Checking abnormality before replacement is important, i.e. checking hydraulics, bearing, clutch cable, oil leakage etc.
Make sure new products are exactly for your application.
If try to engage any same size clutch to your mission,
- A. facing
- No oil or contamination on facing is allowed.
- B. clutch disc
- Check spline teeth or flywheel runout.
- Apply 'little' grease on teeth and drive shaft spline.
- C. flywheel
- Check overheating crack, scoring, warping and contact surface(with facing) flatness.
- D. input shaft
- Check spline wear. Apply little grease on the teeth.
- E. release bearing
- Remove old grease/Apply thin grease. New bearing must slide freely.
- Apply thin grease on fork pivot and fingers. Ensure smooth operation.
Installation
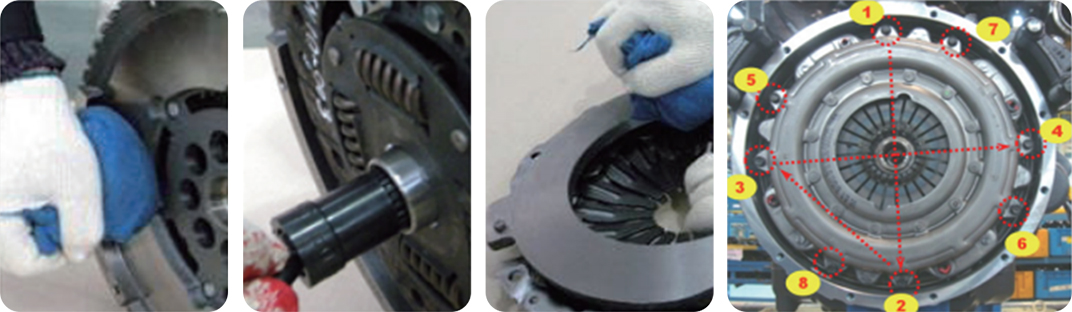
- Make flywheel/pressure plate/disc facing absolutely clean(No dust or rust using solvent or cleaner)
- Use alignment tool to correctly align the disc to flywheel.
- Assemble cover to flywheel dowel holes. Tighten bolts evenly according to diagonal order.
Flywheel to crank(8 bolts)53 ft. lbs. - Install transmission housing carefully. Input shaft slowly with care as first picture shown above.
DO NOT FORCE or use the tightening of the bell housing bolts to draw transmission to the engine block.
Rotate input shaft if necessary to align splines.
DO NOT HANG transmission jack lift, during installation. - Refer to the vehicle manufacturer's specifications for correct adjustment of the clutch.
- After adjusting clutch pedal release distance and hydraulics, take a load test.
Production process
The Highest Quality for Customer Satisfaction
PHC Valeo has made unstinting investment in equipment to manufacture the best product for customer's satisfaction. We're realizing zero defects through building the newest cutting-edge automatic production system and production management which all processes are visible.
Also, we provide the optimal working environment with locating the equipment ergonomically for the workers. We have especially raised the efficiency of the working environment and lowered the dangers, utilizing CoBot. That is, we offer the optimal working environment which is the base of manufacturing products of zero defects.
Safety precautions
- Handle with care
- Do not drop or touch with oily hands.
- Check for smooth installation
- Check if the disc slides smoothly into the shaft before final assembly.
- Remove excess grease
- Remove any excess grease on the input shaft coming out through the disc hub.
- Diagonal bolt tightening
- Gradually tighten the bolts in diagonal directions.
- Check alignment of clutch and transmission
- Check the alignment of the clutch set, especially the disc: do not force the disc onto the shaft.
Warning
- Do not use this clutch for racing, high performance driving, hot rodding, or any situation whenever engine RPMs may exceed manufacturer's specifications for the engine.
- The pressure plate can explode unexpectedly causing serious injury or death to vehicle occupants and bystanders.
- The clutch cover and bell housing will not protect from exploding the pressure plate.
- Always use the recommended clutch set for your specific application.